


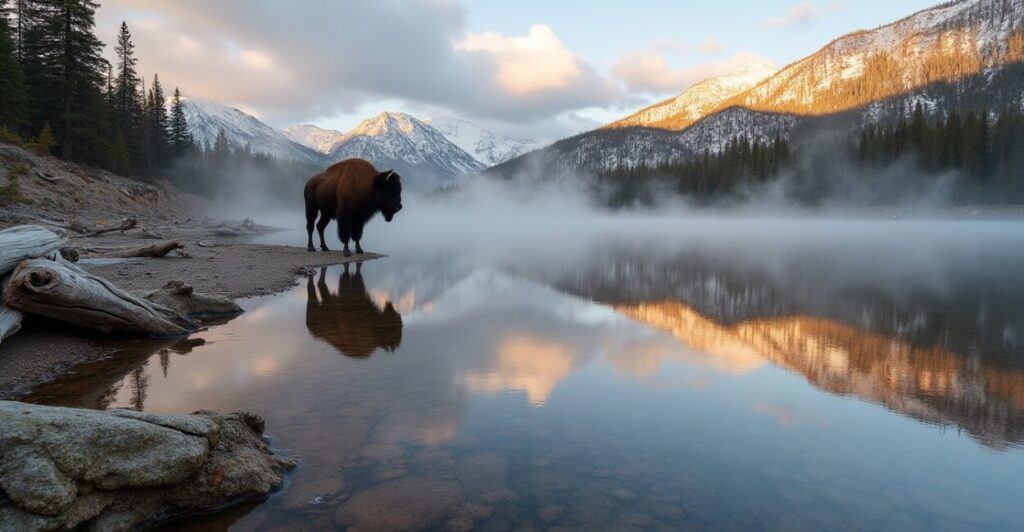
Feel the hush of a dawn mirrored perfectly on glassy water—Yellowstone reflections can turn a simple sunrise into a memory that stops your breath. This guide shows where and how to find those doubled landscapes, especially at Yellowstone Lake and West Thumb.
Discover why calm mornings at Yellowstone Lake or West Thumb create vivid Yellowstone reflections that double your landscape shots, and learn practical tips for timing, gear, and composition to capture them.
Best Times and Places to Catch Yellowstone Reflections
Morning stillness, golden hour light, and sheltered coves make West Thumb and Yellowstone Lake ideal for mirror-like scenes. Look for windless, clear-weather mornings for pristine reflections.
Prime Morning Windows
Arrive well before sunrise to claim a spot. Early light softens colors and reduces glare for cleaner reflection detail and warmer tones on the water.
Check hourly weather forecasts for wind shifts. Even a slight breeze ripples the surface and breaks the mirror effect you’re chasing.
Top Vantage Points
Walk the shoreline near West Thumb Geyser Basin for geothermal contrast against still water. Rocks and pumice create foreground interest and symmetry.
Along Yellowstone Lake’s south shore, find coves protected from prevailing winds. These sheltered bays often hold glassy surfaces long after sunrise.
How Weather and Light Shape Mirror Scenes
Atmosphere, temperature inversion, cloud cover, and wind determine reflection quality. Understanding these elements increases your chances of capturing perfect Yellowstone reflections.
Wind and Surface Tension
Calm air creates high surface tension and sharp reflections. Even light breezes add texture, so aim for wind speeds under five knots for best results.
Temperature differences between land and water can create mist that softens reflections. Use mist creatively for moody, painterly images.
Light Angles and Color
Low-angle sunlight during golden hour enhances contrast and color in reflections. Side lighting reveals surface texture without destroying symmetry.
Overcast skies reduce color saturation but can yield dramatic monochrome reflections. Choose mood over vibrancy depending on your vision.
Composition Strategies for Doubling the Landscape
Use symmetry, leading lines, and foreground anchors to make Yellowstone reflections the star of your composition. Balance sky and water to emphasize the mirror effect.
Symmetry and Framing
Place the horizon near the center to emphasize reflection symmetry. Use natural frames like trees or thermal terraces for depth.
Rotate your camera for vertical shots when a single subject dominates both sky and water. This enhances the doubled visual impact.

Foreground and Scale
Add rocks, logs, or thermal features in the foreground to guide the eye from near to far and strengthen the mirrored composition.
Include wildlife or people at a distance for scale. Their mirrored silhouette adds narrative and a human connection to the scene.
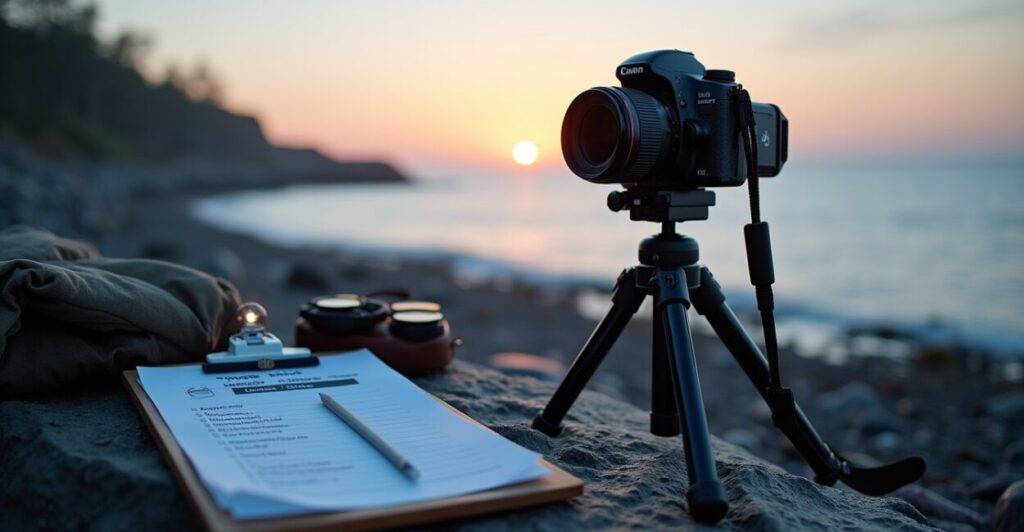
Camera Settings and Gear for Crisp Reflections
Choosing the right lens, aperture, and stabilization matters. For sharp Yellowstone reflections, favor low ISO, moderate aperture, and a steady tripod.
Lenses and Filters
Wide-angle lenses capture sweeping panoramas and doubled vistas. A polarizer can reduce glare but must be rotated carefully to preserve reflections.
Use a telephoto to isolate distant reflected details. Neutral density filters help with long exposures to smooth slight ripples into silky mirrors.
Exposure and Stabilization
Set aperture around f/8–f/11 for sharpness across the frame. Lower ISO to reduce noise, especially in shadowed reflection areas.
Mount on a sturdy tripod and use a remote release. Long exposures during soft light yield cleaner, more detailed mirrored surfaces.
Quick Checklist and Step-by-step Shooting Routine
Prepare before dawn and follow a concise process to maximize successful shots. This routine keeps you focused during fleeting perfect conditions.
Essential Pre-dawn Checklist
Charge batteries, clean lenses, pack filters, and bring layers for cold mornings. Arrive early to scout compositions and mark safe access points.
Confirm park regulations and safety around thermal areas. Always prioritize personal and environmental safety over a shot.
- Scout the shoreline and choose a protected cove or vantage point.
- Set camera on tripod, level the horizon, and compose for symmetry.
- Dial aperture to f/8–f/11, ISO low, and meter for highlights.
- Use remote release and bracket exposures for challenging light.
- Review images, adjust composition, and wait for optimal light.
Field Adjustments
If wind picks up, switch to tighter compositions or telephoto shots to minimize ripples. Use faster shutter speeds to freeze subtle water texture.
When mist forms, expose for midtones and bracket to capture both detail and atmosphere. Embrace imperfect conditions for unique results.
Practical Safety, Access, and Ethical Photography
Respect Yellowstone’s fragile thermal landscapes and wildlife while chasing reflections. Safe, ethical behavior protects the park and your ability to shoot there.
Thermal and Wildlife Precautions
Stay on designated boardwalks in geothermal areas. Ground crust can be thin and dangerously hot—never shortcut or step off trails.
Keep distance from wildlife. Approaching animals can be dangerous and disrupt natural behavior. Use long lenses for close-up portraits.
Permits, Rules, and Respectful Shooting
Commercial filming may require permits; casual photography for personal use generally does not. Check the National Park Service guidelines before planning shoots.
Leave no trace: pack out trash, avoid altering natural features, and respect other visitors seeking solitude or images of the same scene.
Conclusion — Why Yellowstone Reflections Linger in Memory
Yellowstone reflections convert ordinary mornings into cinematic moments of stillness and color. With the right timing, composition, and respect for the place, you capture something rare.
Return often to refine technique and deepen your relationship with the landscape. The mirrored scenes at Yellowstone Lake and West Thumb reward patience and attention to light.
Frequently Asked Questions
When is the Absolute Best Time to Photograph Yellowstone Reflections at Yellowstone Lake or West Thumb?
The best time is during early dawn and golden hour on calm, clear mornings when wind is minimal. Arrive before sunrise to scout compositions and wait for optimal light. Temperature inversions and still air often occur in the first hour, producing the most vivid Yellowstone reflections.
Can I Safely Access the Shoreline Near West Thumb to Shoot Reflections Without a Guide?
Yes, you can access many shoreline areas by staying on trails and boardwalks. Avoid thermal basins and unstable ground; follow park signs and rangers’ advice. For remote or sensitive spots, consider guided tours to ensure safety and minimize impact while capturing Yellowstone reflections.
What Camera Settings Reliably Produce Sharp, Mirror-like Reflection Photos?
Use a low ISO, aperture around f/8–f/11 for depth of field, and a tripod for stability. Meter for highlights and bracket exposures in tricky light. A polarizer or ND filter may help, but rotate the polarizer to avoid reducing the reflection.
How Do I Handle Changing Conditions Like Wind or Mist While Shooting Reflections?
If wind disturbs the water, switch to tighter compositions or telephoto framing to reduce visible ripples. When mist appears, bracket exposures and embrace atmospheric moods—mist can add depth and mystery to Yellowstone reflections.
Are There Any Regulations I Should Know About Before Photographing Yellowstone Reflections?
Follow all National Park Service rules: stay on trails, respect wildlife distances, and obtain permits for commercial projects. Drone use is restricted—check current park policies. Prioritize safety and conservation when photographing Yellowstone reflections.
Useful resources: National Park Service Yellowstone page: nps.gov/yell. Weather forecasts and wind models: NOAA Weather.